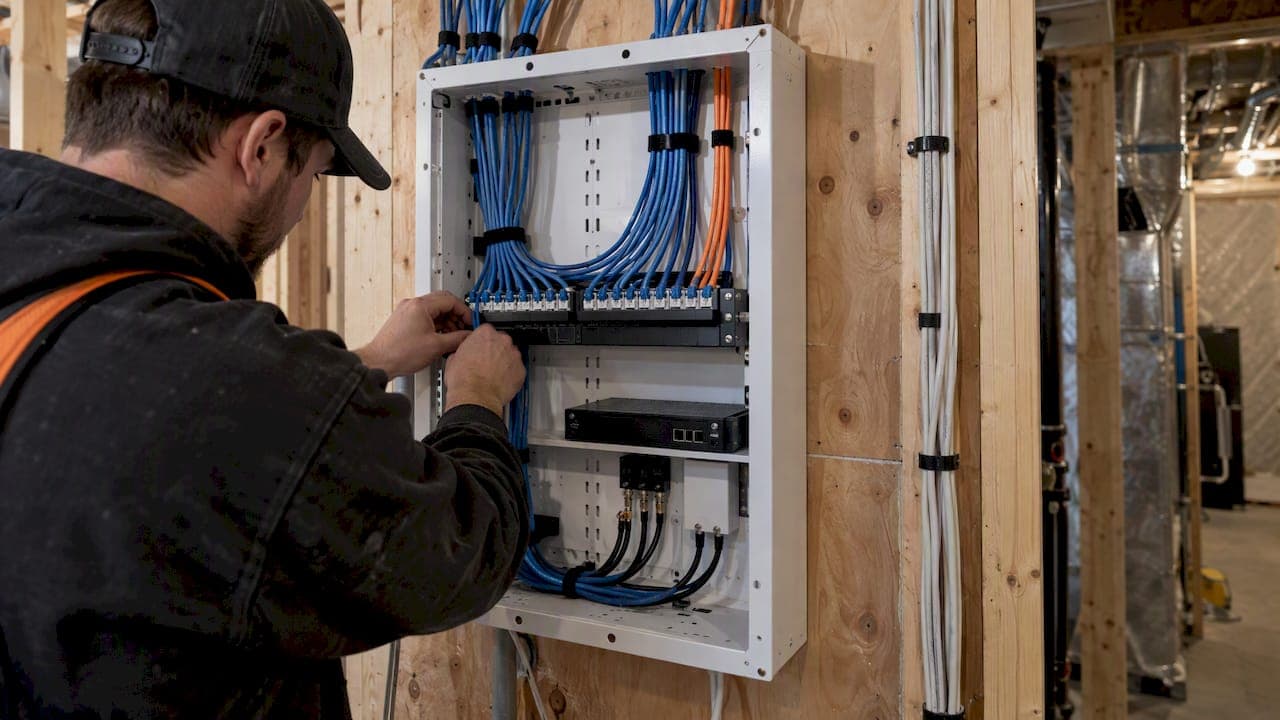
A structured wiring panel is the low-voltage hub of your home. It pulls internet, phone and AV cabling into one enclosure, so you can maintain, trace and upgrade each run without opening walls. It suits new builds, renovations and serious DIY projects, especially when paired with a UPS and clear labelling. We install these panels at JupiterAV, and we follow standard structured cabling practice.
TL;DR:
- Choose plastic with a vented door when routers or access points sit inside; metal suits passive wiring but can block Wi Fi and trap heat.
- Size the enclosure for current ports plus future rooms and devices, then move up if needed; retrofitting a larger box can mean opening drywall.
- Label each cable at both ends, map panel ports to rooms, and leave service slack; test every run before drywall closes.
- Use a UPS sized for the combined equipment load, and have a licensed electrician install any outlet or perform work involving mains power.
Table of Contents
- What a structured wiring panel contains and how it differs from the electrical service panel
- Enclosure types and materials: plastic vs metal, vented vs sealed
- Common modules and components to install inside the enclosure
- Sizing, mounting and layout: plywood backing, RU sizing, wall-mount vs rack
- Cabling and termination best practices for structured wiring
- Thermal, RF and power considerations for active equipment
- Pre-installation checklist and quick step-by-step planning
- Maintenance and future-proofing: spare capacity, documentation and periodic checks
- Why professional installation adds value for builders and homeowners
- How we can help with structured wiring design and installation
- FAQ
- Sources
What a structured wiring panel contains and how it differs from the electrical service panel
A structured wiring panel, also called a structured media enclosure, is a low-voltage cabinet. It holds the equipment that distributes data, voice and video signals from where they enter the house to every room. If you picture the home's electrical panel as the heart of the power system, this is the heart of the network.
Enclosures contain some mix of these parts:
- Enclosure: the metal or plastic box that mounts between studs or on a backboard.
- Patch panel or network distribution module: where room cables terminate and connect to your router and switch.
- Keystone plates and inserts: snap-in jacks for data, coax or HDMI, so you can change a port type without rewiring.
- Power module or UPS: supplies outlets inside the cabinet for the router, switch and other gear.
- Cable management: velcro straps, D-rings and bridges that keep patch cords neat.
- Blank panels: cover unused slots and leave a place to grow.
The most common mistake we see is assuming this box is another electrical panel. It is not. The home's service panel is the central distribution point for electricity, and it should be treated separately from low-voltage wiring for safety. Putting your network cabling in the same space as breakers and mains conductors invites problems.
Installers also keep the two systems apart for performance. Installer guidance on EMI explains that separating low-voltage communication wires from high-voltage lines, and terminating them properly, reduces electromagnetic interference and fire hazards. It also improves reliability for sensitive home electronics.
A practical side benefit is inspection. When low-voltage cabling lives in its own enclosure, an electrician can work in the service panel without disturbing your network, and we can work in the media cabinet without touching mains power. Each trade stays in its own lane, and both jobs go faster.
One caveat: the enclosure usually needs a nearby power outlet. That outlet is a mains circuit, so it should be installed by a licensed electrician, not by someone running network cable.
Enclosure types and materials: plastic vs metal, vented vs sealed
Choosing the enclosure material is the decision most people make last and regret first. The right choice depends on what lives inside: passive cabling only, or active gear that transmits wireless signals and gives off heat.
- Plastic enclosures are Wi‑Fi transparent, so a router or access point inside can still reach the rest of the house. They are lighter and easier to cut into, though they offer less physical protection.
- Metal enclosures are rigid, durable and grounded, which suits passive wiring and heavier equipment. The trade-off is that a closed metal box blocks and reflects wireless signals.
- Vented doors let warm air escape, which matters once a switch, router and power supplies share the space.
- Sealed or solid doors look clean and keep dust out, but they trap heat and are best reserved for cabinets that hold only passive parts.
Manufacturers of enclosures flag two common oversights: thermal management and wireless signal interference. Enclosure guidance from Lansing notes that a vented, RF-transparent plastic enclosure significantly improves the performance of wireless gear and the cooling of active components. The same source points out that plastic enclosures are increasingly favoured over metal in modern smart homes because they are Wi‑Fi transparent.
You do not have to abandon metal to get these benefits. Adding a plastic vented door or trim ring to a metal enclosure can improve both RF performance and thermal management. That is a handy fix in a retrofit, where the metal box is already in the wall.
Here is how we usually decide:
- If the cabinet holds only patch panels and cabling, metal with a standard door is fine.
- If it holds a router, switch and a mesh node, choose plastic with a vented door, or a metal box with a plastic vented trim.
- If you plan to add gear later, assume you will need ventilation and pick accordingly now.
Pro Tip: If you want Wi‑Fi coverage from inside the cabinet, mount the access point at the top of a plastic enclosure and keep it away from metal brackets and power bricks.
Common modules and components to install inside the enclosure
Once the box is chosen, the modules inside decide how useful it is. They snap, screw or clip into standard positions, which is why a good enclosure can be reconfigured years later without replacing the existing cable.
- Network distribution modules: a typical unit is a multiport interface that takes incoming room cables on one side and presents jacks for patching on the other. It usually mounts on the enclosure's rails or on a bracket that fits the cabinet's slots.
- Patch panels: a rack-style panel terminates each cable on a punchdown block and presents a numbered RJ45 port on the front. Because the terminations are fixed, you only move patch cords when you change what a room connects to.
- Loaded keystone panels: these use individual snap-in jacks, which lets you mix data, coax and HDMI in one plate. Preloaded jacks save time, while punchdown jacks let you terminate cable exactly where you need it.
- Cable management: horizontal bars, D-rings and velcro straps keep cords from knotting around other gear.
- Blank panels and shelves: blanks close the openings you are not using, and a small shelf holds a modem or a media gateway that cannot be rack-mounted.
- Power module or UPS: a basic power strip with surge protection is the minimum. A small UPS is better, because it keeps your router and modem alive through brief outages and gives clean power to everything inside.
The punchdown versus preloaded choice comes down to cabling volume and flexibility. A large home with many drops is usually cleaner on patch panels, while a smaller home with mixed signal types is easier on keystones. We often combine both in one cabinet.
When you list parts for a purchase or brief a builder, specify the enclosure size, the number of Cat6 ports, the coax and phone needs, the power module and the blank panels together. That way nothing arrives that does not fit the cabinet.
Sizing, mounting and layout: plywood backing, RU sizing, wall-mount vs rack
Sizing is where a neat install either leaves room to grow or runs out of space in a year. The goal is a cabinet that is sturdy, serviceable and a little bigger than you need today.
Start with the mounting surface. We recommend a plywood backboard behind or beside the enclosure where the build allows it, because it gives you a solid place to screw in equipment, bridges and strain-relief points. In a stud-mounted enclosure, fixing it flush between studs works, but plywood gives more flexibility for add-ons.
Next, choose the format. A small wall-mount cabinet suits most houses: a router, a switch, a modem and a patch panel. A rack is for larger systems with a lot of AV gear, a network video recorder or several amplifiers. Rack space is measured in rack units (RU), which describe vertical height, and enclosure sizes are often described in RU equivalents.
Use this order when laying out a cabinet:
- Place the incoming service (internet, phone and coax entry) at the top, where cables arrive from the ceiling or attic.
- Put the network gear (modem, router, switch and patch panel) in the middle, at eye level for easy access.
- Mount the power module and UPS at the bottom, where their weight is best supported and their cords are shortest.
- Keep clear vertical channels on each side for cable runs, so power and data do not tangle.
- Reserve a labelling zone on the door or panel faces, where a printed port map is easy to read.
To estimate spare capacity, count the ports you need today and allow extra capacity for future rooms and devices. If that margin pushes you past the cabinet's capacity, move up one size now. Replacing an enclosure later means opening drywall, and a larger box costs little by comparison.
Cabling and termination best practices for structured wiring
Good cabling is invisible when it works and a nightmare when it does not. Poor terminations, tight bends or unlabelled runs can cause problems, not bad equipment.
- Cable type: Modern home networks benefit from suitable cabling because it handles higher speeds and gives you headroom. Older installs may use other cable types for basic internet, but they leave less room for growth.
- Punchdown technique: strip only as much jacket as you need, keep the twists as close to the termination point as possible, and seat each conductor with a proper IDC punchdown tool.
- RJ45 patching: use factory-made patch cords between the panel and your gear. They are more reliable than hand-crimped ends and easier to replace.
- Service loop: leave enough slack at the enclosure to re-terminate a cable once or twice without pulling a new run.
- Bend radius: avoid sharp bends and tight staples, because crushed or kinked cable can cause errors that are very hard to trace.
- Separation: keep low-voltage runs away from electrical wiring. Installer guidance ties this separation to lower interference and fire risk.
Labelling saves more troubleshooting time than any tool. A convention we like is to label each cable at both ends with the room name and port identifier, such as a room name and port label for the first data drop in the master bedroom. Then map each panel port to its room on a printed sheet kept near the enclosure. When something stops working, you can find the right port quickly.
Keep the work in the right hands. Running and terminating network cable is a reasonable DIY job, but anything touching mains power is not. Adding an outlet inside or next to the enclosure, or changing the electrical service, should go to a licensed electrician.
Pro Tip: Photograph every wall cavity with the cables visible before the drywall goes up. The pictures become your wiring map when a cable needs tracing years later.

For a deeper walkthrough of cable selection and termination, our home ethernet wiring guide covers the details for homeowners.
Thermal, RF and power considerations for active equipment
A cabinet full of passive cable is easy. Once you add a router, a switch and a few power adapters, you have a small heat source in a closed box, and the plan needs to account for it.
Watch for these signs of trouble:
- Equipment that feels hot to the touch or has a warm exterior after hours of use.
- Random reboots, dropped connections or slow speeds that clear up after a power cycle.
- A faint smell from power supplies, or dust built up on vents and fans.
The enclosure itself is part of the answer. As noted earlier, manufacturer guidance holds that a vented, RF-transparent plastic enclosure improves both wireless performance and cooling for active gear. A plastic vented door or trim ring added to a metal cabinet has a similar effect.
For fans and venting, put intake low and exhaust high so warm air rises out of the cabinet naturally. Our installers cover the logic in more depth in our guide to AV rack cooling, including a quiet-fan approach for living spaces.
Installer insight: Neglecting thermal management and wireless interference is among the most common oversights in enclosure design, according to enclosure manufacturers. A vented, RF-transparent enclosure addresses both at once.
For power, add the wattage of your router, modem and switch, then choose a UPS that covers that load with room to spare. Our home network UPS guide walks through sizing step by step. Place outlets inside the cabinet so cords are short and tidy, and avoid daisy-chaining power strips.
Pre-installation checklist and quick step-by-step planning
Most structured wiring problems are planning problems. A short checklist before the drywall goes up saves you from fishing cable through finished walls.
Confirm these prewire items first:
- Wall plate locations in every room, including TV walls and home offices.
- Device locations for Wi‑Fi access points, cameras and keypads.
- Conduit runs for anything you may want to replace or add later.
- Special prewires for motorised shades or multiroom audio, which are cheap to run now and costly to add later.
Our prewire checklist covers what to run before drywall in more detail.
Then follow this sequence:
- Rough-in: run all cables from each room back to the enclosure location, leaving generous slack at both ends.
- Enclosure fit: mount the backboard and enclosure, and confirm there is a power outlet nearby.
- Termination: punch down or terminate every cable on its panel or keystone.
- Equipment mounting: install the router, switch, UPS and modules in the layout you planned.
- Labelling: tag every cable and port, and print the wiring map.
- Testing: check each run before the walls close.
For testing, a simple link tester confirms continuity and correct pin order, which is enough for most homes. Full certification measures actual performance against the cable standard, and it matters on large or high-speed installs. Either way, keep the results with your documentation.
Know when to call a professional. If the job involves a new service, a panel upgrade or anything touching mains power, hire a licensed electrician. Home electrical overviews say that complex tasks like service upgrades belong with a licensed electrician. For a complex new connection, a specialist electrical contractor shows what that scope can include. Large multiroom systems with dozens of drops are also worth handing to an integrator.
Maintenance and future-proofing: spare capacity, documentation and periodic checks
A well-planned panel should remain tidy over time. That takes a bit of spare capacity and a habit of keeping records.
- Spare ports: aim to leave some patch panel or keystone positions open. Blank panels cover the gaps and show where new modules can go.
- Cable slack: keep a service loop at the enclosure so a damaged termination can be redone without a new run.
- Documentation: store a wiring diagram, a label legend and a copy of the port map in a sleeve inside the cabinet door, or in a folder nearby.
- UPS checks: test the battery every few months and replace it when the unit warns you or the runtime drops.
- Dust and heat: open the cabinet twice a year, clear dust from vents and feel for hot spots.
- After changes: if a renovation, a new device or a trade visit touches the cabinet, reconfirm terminations and update the map.
The installer perspective is simple. A properly organised media enclosure acts as the backbone of a smart-home ecosystem, and centralizing controllers and networking equipment simplifies maintenance and upgrades while keeping clutter under control.
Plan the upgrade path now. If you pull Cat6 today, you can move to faster ethernet standards by swapping switches and patch cords, without touching the walls. Leave room for a larger switch, a network video recorder or an extra amplifier, and keep a few spare conduit runs for anything that arrives later.
For a broader look at how the equipment inside connects, our smart home networking guide covers router, switch and access point choices.
Why professional installation adds value for builders and homeowners
Our view is that the panel is the part of a smart home you only notice when it is done badly. A clean enclosure, labelled ports, a cooled cabinet and room to grow are what separate a system that ages well from one that needs a rebuild.
At JupiterAV, we design and install low-voltage wiring, smart home control, audio and video, security and networking as one system, with a single point of contact. That means the person planning your prewire also knows where the shades, speakers and cameras will land. Our priorities are neat cable management, cooling, future capacity and installs that disappear into the architecture.
DIY is a sensible route for a small enclosure, a handful of drops and plenty of time. Call a pro when the house is large, the walls are going up soon, the equipment is active and expensive, or mains power is involved. The cost of a wrong guess is a retrofit.
— JupiterAV
How we can help with structured wiring design and installation
If you would rather hand off the planning, we can take it from prewire to a finished, labelled cabinet. We offer:
- Design and prewire planning with your builder or trades.
- Enclosure supply, installation and neat cable termination.
- Integrated AV, networking and smart home equipment in one system.
Request a site visit and we will walk through your plans, or bring your own prewire checklist and we will go through it with you. You can learn more and contact our team at JupiterAV.

FAQ
What is structured cabling and why is it used?
Structured cabling is an organized system that manages all low-voltage wiring in a home, including internet, phone and television, from one central enclosure. It is used because it makes rooms easy to reconfigure, problems easy to trace and upgrades easy to add. You change a patch cord instead of rewiring a wall.
What accessories are available for Legrand On-Q enclosures?
Brands such as Legrand, Leviton, Channel Vision and ICC make modules for their enclosures, including network distribution modules, keystone inserts, blank panels, shelves and power modules. Exact accessories depend on the enclosure model and size. Check the maker's datasheet before you order, and we can spec parts to match your cabinet.
What is structural wiring in a house?
The usual term is structured wiring, which means the low-voltage cabling for data, phone and video that runs from each room to a central panel. It is separate from your electrical wiring, which carries mains power. Keeping them apart reduces interference and simplifies inspections.
What are the major standards used for structured cabling?
Residential structured cabling follows common cable categories such as Cat5e and Cat6, plus installer guidance on separation, termination and labelling. The exact code and standard references vary by region and project. Ask your installer which ones apply to your build, and keep the documentation with your wiring map.