For most living rooms, the Sonos Beam (Gen 2) paired with a Sub Mini gets you clear dialogue and real bass without dominating the credenza. Smaller bedrooms or condos do better with the Ray, and larger or open-concept rooms need the Arc Ultra with a Sub 4. Whatever size you land on, connect it through HDMI eARC (ARC as the older fallback), and add a Sub plus two rear speakers when you're ready for full surround.
TL;DR:
- Connecting via HDMI eARC is essential for Dolby Atmos support; using optical limits Atmos and automatic remote control features.
- Larger rooms over 350 square feet benefit most from the Arc Ultra with a Sub 4 and rear speakers, while smaller spaces may manage with the Ray or Beam (Gen 2).
- Proper setup requires adjusting TV audio settings to passthrough, enabling CEC, and running Trueplay calibration after any new speaker addition.
- A wired Sonos connection or a strong 5GHz Wi-Fi network significantly improves stability and reduces audio dropouts during Atmos playback.
- Adding a Sub enhances dialogue clarity by offloading bass and should be prioritized over rear speakers if budget or space is limited.
Table of Contents
- Which Sonos model fits your room and TV size?
- Does your TV support eARC, or just ARC?
- How do you connect Sonos to your TV step by step?
- Should you add a sub and rear speakers?
- Why isn't your Sonos soundbar playing sound?
- When does a Sonos installer visit actually pay off?
- Does your TV brand change how Sonos connects?
- Can you skip the TV remote and just talk to Sonos?
- What Wi-Fi setup keeps Sonos TV audio from stuttering?
- What can you actually do inside the Sonos app?
- What does 15 years of Sonos installs actually teach you?
- Want a Sonos setup that just works, the first time?
- Sources
Which Sonos model fits your room and TV size?
Sonos ties its own pairing recommendations to square footage, not soundbar price. For a room under 200 square feet, the Ray paired with a Sub Mini and two Era 100 speakers covers dialogue and effects without overwhelming a smaller space. Rooms between 200 and 350 square feet call for the Beam (Gen 2) with either a Sub Mini or Sub 4, again with two Era 100 units for the rear channels. Once you're past 350 square feet, Sonos' own guidance points to the Arc Ultra with a Sub 4 and a pair of Era 100 or Era 300 speakers for the rears.
The choice between soundbars comes down to three things: Dolby Atmos support, footprint, and budget.
- Ray: No Atmos, no HDMI, connects via optical only. Fine for casual viewing, not built for immersive movie nights.
- Beam (Gen 2): Supports Dolby Atmos through virtualization, fits on most media consoles, and is the practical middle ground for a family room.
- Arc / Arc Ultra: Full Atmos with dedicated upward firing drivers, wider soundstage, and the Arc Ultra adds Sonos' newer Sound Motion technology for tighter bass without a separate amplifier stage.
For rears, the Era 100 handles stereo surround duty well in most rooms. The Era 300 adds height channels of its own, which matters if your ceiling can't support in-ceiling Atmos speakers. One thing to skip: using an Era speaker or a Sonos Five as your primary TV output. They're designed for music, and running TV audio through Bluetooth or line-in on a portable speaker introduces enough delay that dialogue and lips stop lining up.
Before you buy anything, check three things: does your TV have an ARC or eARC port, how much shelf or wall space do you actually have, and what's the ceiling on your budget once you add a sub. If you're also rethinking the screen itself, it's worth reading about matching TV size to viewing distance before you commit to a soundbar width.
Does your TV support eARC, or just ARC?
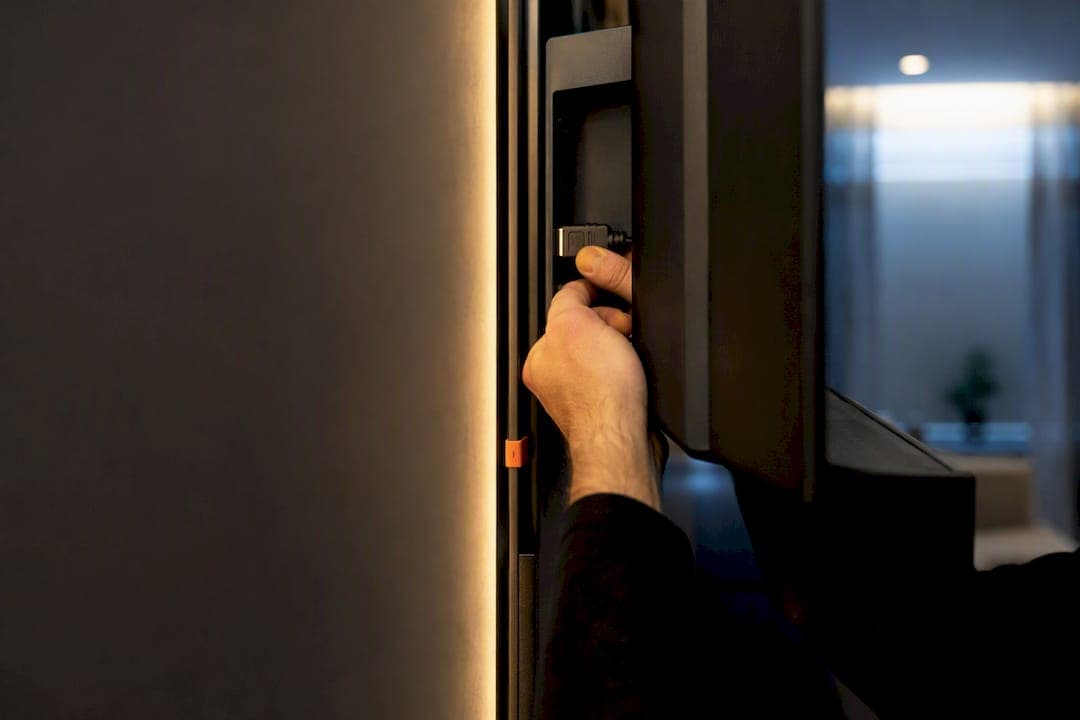
HDMI ARC (Audio Return Channel) sends compressed audio like Dolby Digital back from the TV to a soundbar over a single cable. eARC (enhanced ARC) does the same job with far more bandwidth, and it's the only path that carries full, uncompressed Dolby Atmos. If your TV and Sonos soundbar are both eARC-capable, that's the connection to use every time.
Arc, Arc Ultra, and Beam (Gen 2) all need HDMI ARC or eARC to play Dolby Atmos from a TV at all. Connect through optical instead, and Atmos playback is off the table entirely, along with some CEC-based conveniences like volume control through your TV remote.
If your TV has no ARC or eARC port, Sonos includes an optical adapter with the Beam and Arc specifically for this scenario. It works reliably as a fallback, but you're trading away automatic power sync and Atmos.
Before connecting anything, check your TV's settings menu for:
- Audio output — set to "TV Speakers Off" or "External Speakers" depending on the brand.
- Digital audio format — look for "Bitstream" or "Auto/Passthrough" rather than PCM, which down mixes everything to basic stereo.
- CEC (sometimes labelled Anynet+, Bravia Sync, or SimpLink depending on the manufacturer) — this needs to be on for one-remote volume control.
Most ARC and eARC ports on the back of a TV are labelled directly on the panel, usually the HDMI input closest to the optical or power connections.
How do you connect Sonos to your TV step by step?
- Locate the HDMI port on your TV labelled ARC or eARC and connect an HDMI cable from there to the corresponding port on your Sonos soundbar.
- If your TV has no ARC/eARC port, connect the optical cable from the TV's optical output to the Sonos optical adapter, then plug that into the soundbar.
- Power everything on, then open the Sonos app and select Add Product, choosing your soundbar model when prompted.
- Assign the soundbar to a room name that matches where it physically sits (this matters later for grouping and voice control).
- Run Trueplay tuning if you're on iOS. It listens to your room's acoustics through your phone's microphone and adjusts the EQ accordingly, though some models support Android tuning through alternative methods rather than the full iOS Trueplay flow.
- Link your TV remote to the soundbar through the app's guided setup so it recognizes existing volume and power commands.
- In your TV's settings, confirm CEC is enabled, turn on TV Autoplay if offered, and set digital audio output to bitstream or passthrough rather than PCM.
The most common mistake at this stage is leaving the TV's internal speakers switched on alongside the soundbar, which causes doubled or echoing audio. The second most common: forgetting to flip digital audio from PCM to passthrough, which silently kills Atmos before it ever reaches the Sonos unit.
Pro Tip: Play an Atmos-encoded scene from a streaming app, then open Now Playing in the Sonos app. If it correctly reports "Dolby Atmos" instead of "Dolby Digital" or "PCM," your passthrough settings are working.
Should you add a sub and rear speakers?
A dedicated subwoofer does more than add rumble. Sonos points out that offloading bass frees the soundbar's own drivers to focus on midrange and treble, which is where dialogue actually lives. That's why adding a sub tends to make speech sound clearer, not just louder.
- Smaller rooms and apartments: Sub Mini offers tighter, more contained bass suited to close listening distances.
- Larger rooms or dedicated theatre spaces: Sub 4 moves more air and holds up better against a bigger screen and higher ceilings.
Placement rules are simple but often ignored: keep the sub away from corners where bass builds up unevenly, and give rear speakers roughly ear-height placement, angled slightly toward the seating area rather than straight into a wall. For a deeper look at bass positioning specifically, our subwoofer placement guide covers the room-node problem in more detail, and placement for Atmos-capable rears is worth a read if you're running Era 300s for height channels.
Run Trueplay again after adding any new speaker, not just the first time. Each addition changes the room's acoustic profile enough to justify a fresh tune. Inside the app, dig into audio settings for Speech Enhancement (pushes dialogue frequencies forward) and Night Sound (compresses dynamic range so explosions don't wake the house).
Pro Tip: If you're gaming, turn off any aggressive audio processing modes on the TV itself. They add processing latency that a movie soundtrack won't notice but a competitive shooter absolutely will.
Why isn't your Sonos soundbar playing sound?
- Start with a full power cycle: unplug the Sonos unit, the TV, and your router, wait 20 seconds, then restart them in that order. This resolves a surprising share of connectivity issues on its own.
- Confirm the HDMI cable is actually in the port labelled ARC or eARC, not a standard HDMI input. Swapping to the optical adapter briefly will tell you if the port itself is the problem.
- For lip sync issues, check for a manual audio delay setting in the Sonos app first, then disable any TV-side "game mode" or noise-reduction processing that adds its own lag.
- Ungroup speakers temporarily if sync drift appears only during multi-room playback.
- If Atmos content plays as plain stereo, recheck the TV's digital audio format setting. It has likely reverted to PCM after a software update.
- When none of this works, update firmware on both the TV and the Sonos app, then try a full room reset. Note your TV model, firmware version, and exact symptom before calling for support so a technician isn't troubleshooting blind.
When does a Sonos installer visit actually pay off?
Some fixes are a two-minute app tweak. Others aren't. A professional visit earns its cost when you're dealing with in-wall cable routing, a mount over a fireplace or uneven wall, or an eARC handshake issue that survives a full power cycle and firmware update.
Professional installers work through a fixed checklist on every Sonos install: room dimensions against Sonos' recommended pairings, TV height and seating distance, whether the ceiling can support true overhead Atmos speakers or needs Era 300s instead, and a final Trueplay calibration pass. On ARC edge cases specifically, isolating the problem often means testing with a known-good HDMI cable and a different source device to confirm whether the TV or the soundbar is at fault, and that kind of process of elimination is faster with two hands on-site than over the phone.
The practical payoff is fewer return visits: cables hidden the first time, Atmos confirmed working before the installer leaves, and a warranty tied to the install itself rather than a mess of self-taught workarounds.
Does your TV brand change how Sonos connects?
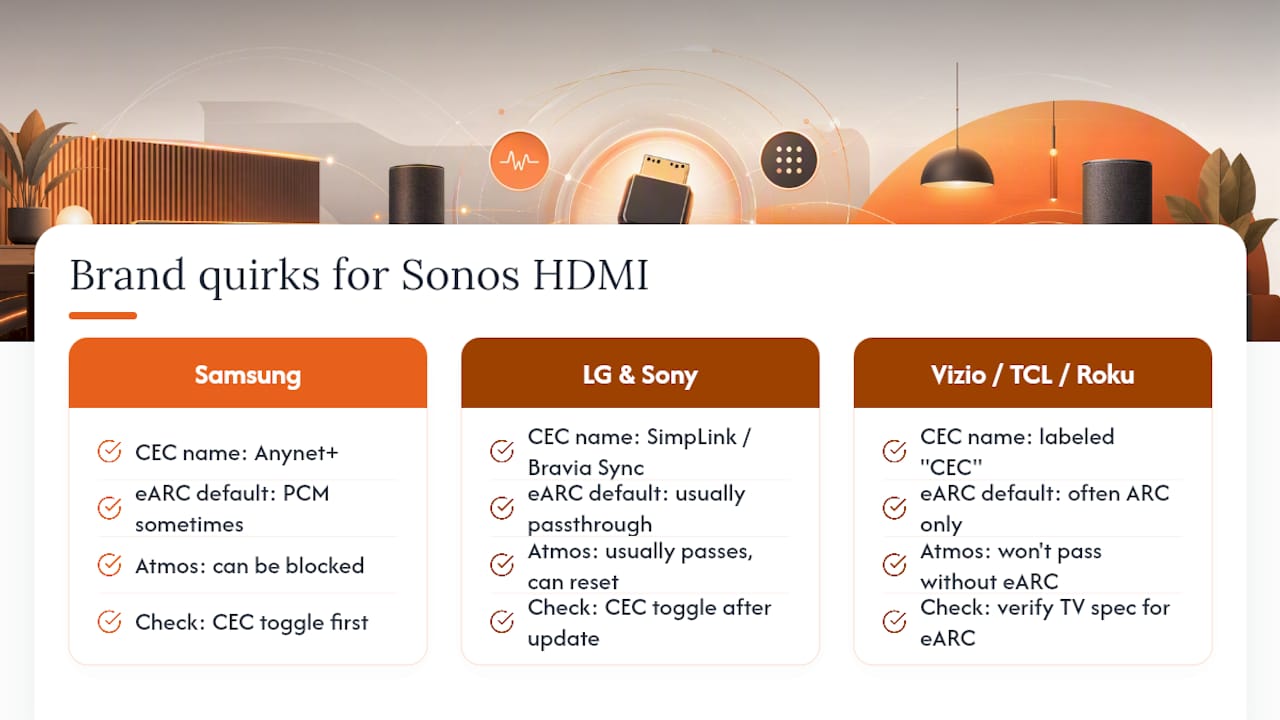
The eARC standard is universal, but each TV manufacturer implements CEC a little differently, and that's where most brand-specific quirks show up. Samsung calls its version Anynet+, LG uses SimpLink, Sony has Bravia Sync, and Vizio and TCL/Roku TVs typically just label it "CEC" in a general settings menu. If Sonos volume control through your TV remote isn't working, the CEC toggle for your specific brand is usually the first thing to check, not the HDMI cable.
Samsung TVs from the past few years occasionally default their eARC port to PCM-only output rather than bitstream, which silently blocks Atmos even with a correct HDMI connection. Sony and LG TVs generally default to passthrough already, but a software update can quietly reset that setting back to PCM.
Roku TVs and other budget smart TV platforms sometimes lack a true eARC port altogether, relying on standard ARC with lower bandwidth. In that case, Dolby Atmos won't pass through regardless of how the Sonos side is configured. That's a hardware ceiling, not a settings problem, and it's worth checking your TV's spec sheet for "eARC" specifically, not just "ARC," before assuming a setup mistake.
Smart TV operating systems (Google TV, WebOS, Tizen, Roku OS) don't materially change how Sonos connects since the audio path runs through HDMI or optical regardless of the software layer above it. Where they do matter is app-level audio settings buried in different menu structures, which is why the exact toggle names vary even though the underlying goal, enabling bitstream and CEC, stays the same everywhere.
Can you skip the TV remote and just talk to Sonos?
Once CEC is properly linked, your existing TV remote controls Sonos volume and mute without any relearning. Point the remote at the TV as usual, and the volume commands get passed through to the soundbar automatically. This is the setup most homeowners actually want. No new remote to find, no app open on a phone every time the ads get too loud.
Voice control runs on a separate track. Sonos soundbars with a built-in microphone support Amazon Alexa directly, letting you ask for volume changes or basic playback control by voice. Google Assistant integration works through supported Sonos speakers as well, though the exact assistant options depend on the specific model and region, so check your soundbar's own spec page rather than assuming every model supports every assistant.
The Sonos app itself remains the fallback for anything CEC and voice can't handle: switching inputs, adjusting EQ, or grouping the TV soundbar with other speakers in the house for a party mode. Worth knowing: if you group your TV soundbar with other rooms for music playback, TV audio pauses automatically when you switch inputs back, so you don't get stuck manually ungrouping every time you turn the television back on.
What Wi-Fi setup keeps Sonos TV audio from stuttering?
Sonos speakers form their own mesh network called SonosNet when at least one unit connects to your router by Ethernet, and that's the most stable configuration for a primary TV soundbar. Without a wired connection anywhere in the system, every speaker relies on standard Wi-Fi, which is where dropouts and sync glitches during multi-room playback tend to originate.
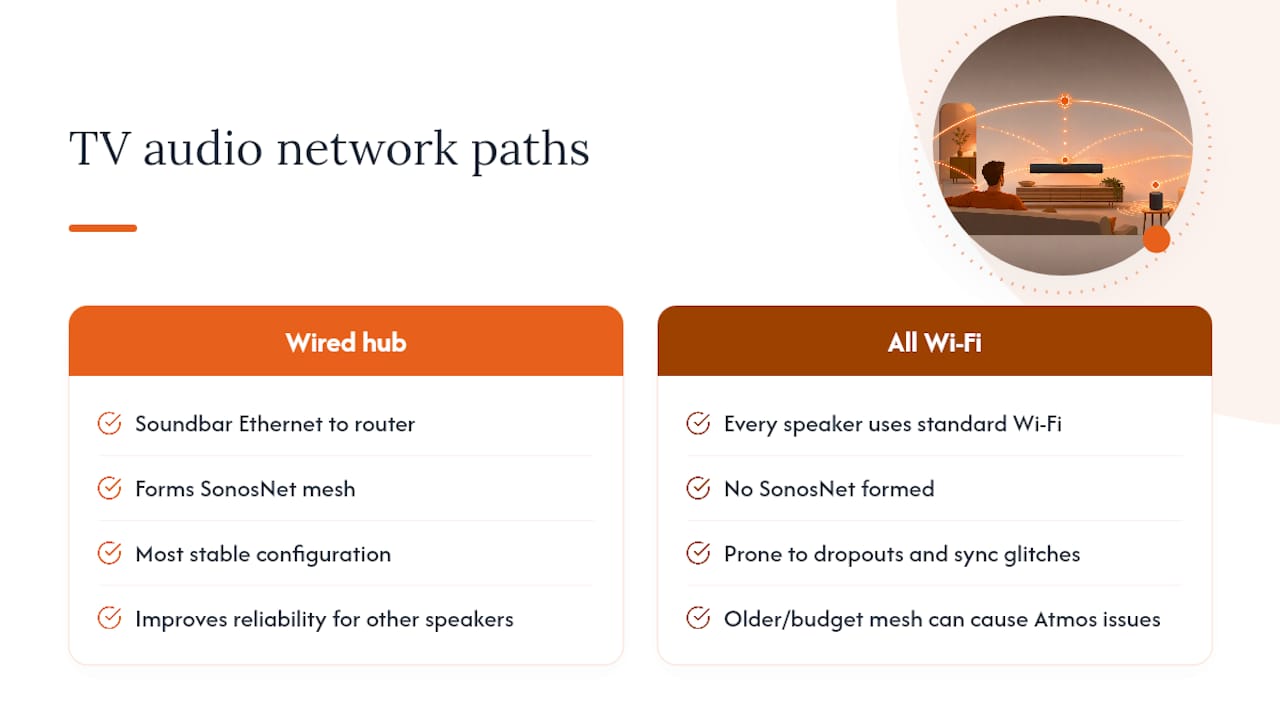
A single wired Sonos unit, even just the soundbar itself connected via ethernet to your router, dramatically improves reliability for everything else in the system, since the other speakers then talk to that wired unit instead of fighting for Wi-Fi bandwidth directly.
If ethernet isn't practical, keep your router's 5GHz band available and avoid placing the soundbar inside a media cabinet with a closed door, which attenuates signal more than most people expect. Mesh Wi-Fi systems generally work fine with Sonos, but older or budget mesh routers with weak backhaul between nodes are a common, underdiagnosed cause of dropouts during Atmos playback specifically, since the bitstream is heavier than a standard stereo signal. If audio cuts out intermittently rather than failing outright, network instability is worth ruling out before assuming a hardware fault.
What can you actually do inside the Sonos app?
The Sonos app is where most of the tuning happens after the initial hookup. Under each room's settings, you'll find EQ controls (bass, treble, and loudness compensation), Speech Enhancement for pulling dialogue forward, Night Sound for compressed late-night listening, and Trueplay access for room-specific calibration.
Now Playing at the top of the screen tells you exactly what audio format is currently streaming through the system, Dolby Atmos, Dolby Digital, or plain PCM, which makes it the fastest way to confirm your TV's passthrough settings are actually working rather than guessing from the sound alone.
Grouping controls let you combine the TV soundbar with other Sonos speakers around the house for music, then automatically split them back apart when TV audio resumes. Software updates for the soundbar, sub, and rears show up in the same app, and skipping them is a common, avoidable cause of Atmos suddenly stopping mid-setup for no obvious reason.
What does 15 years of Sonos installs actually teach you?
The advice you'll find everywhere treats a Sonos soundbar like a plug-and-play gadget. Buy it, plug in one cable, done. In practice, the gap between a fine setup and a genuinely great one comes down to details nobody puts on the box: whether your TV's eARC port defaults to bitstream or silently reverts to PCM after a firmware update, whether your mesh Wi-Fi backhaul can actually carry an Atmos stream without stutter, whether your ceiling height makes Era 300 rears a better call than trying to force in-ceiling speakers into a room that wasn't built for them.
Most people troubleshoot backwards. They blame the soundbar first, when the actual fault sits in a TV settings menu or a router placed inside a cabinet. Start with the connection type and the passthrough setting before touching anything else.
The other thing conventional advice underweights: a subwoofer is not a luxury upgrade, it's the single change most likely to fix muddy dialogue, which is the complaint that sends most people shopping for a soundbar in the first place. Get the port and format right, add a sub before rears if budget forces a choice, and tune with Trueplay every time the room's speaker count changes.
— JupiterAV
Want a Sonos setup that just works, the first time?
Sonos systems reward careful setup, but getting eARC, passthrough, and room tuning right the first time takes more trial and error than most homeowners want to spend an evening on. Professional installers sell, install, and calibrate full Sonos systems, from a single Ray in a bedroom to a full Arc Ultra and Era 300 surround setup in a dedicated theatre room.

A booked visit covers the full picture: matching the right soundbar and sub to your actual room, running the HDMI or optical connection correctly the first time, wiring rears cleanly through walls instead of running cable along the floor, and finishing with a proper Trueplay calibration before we leave. If you'd rather see a complete Sonos bundle laid out in one place first, this Arc and Era 100 immersive set shows a typical full-surround configuration. When you're ready to get a quote for your own room, request a consultation with JupiterAV and we'll scope the right setup before anything gets installed.
Sources
- The Ultimate Guide to a Sonos home theatre — Sonos
- How to hook up Sonos to TV — The Product Pit Stop