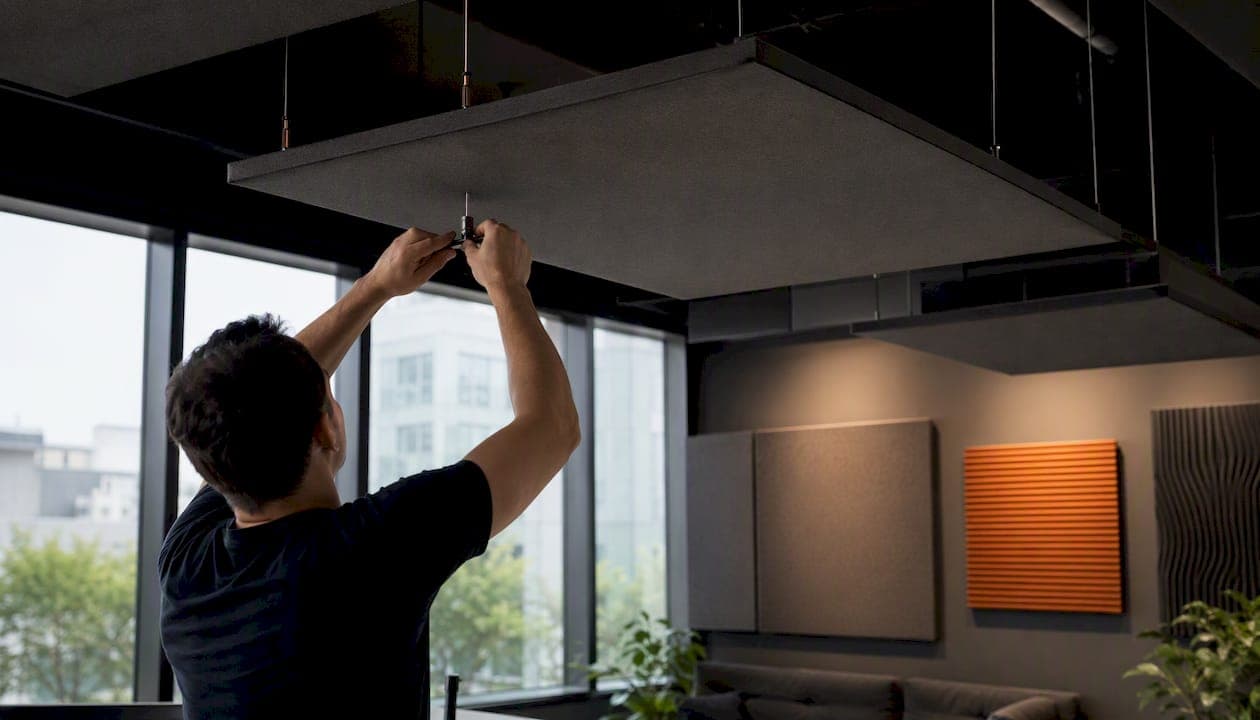
Start with the ceiling. That single move, adding baffles or acoustic clouds to the largest reflective surface in the room, delivers more reverberation reduction per dollar than almost anything else you can do in an open-plan office. From there, add targeted wall absorption at first-reflection points, and layer in sound masking if speech privacy is a concern. For most Canadian offices, that three-step sequence, ceiling first, walls second, masking third, is the fastest path to a measurable improvement.
Quick action plan: If budget is tight, start with a few fabric-wrapped panels on the hardest parallel walls and a rug or two in high-traffic zones. If you have confidential conversations happening, glazed partitions, or a floor larger than roughly 500 sq. ft., bring in a professional for an on-site RT60 measurement before spending anything. The two key metrics to track are RT60 (target 0.4–0.6 seconds for open plan) and background noise level (target 40–48 dB LAeq). Home Depot Canada carries entry-level panels for pilot projects; commercial-grade work needs a specialty supplier or a certified installer.
Key takeaways
Effective office acoustic treatment starts with a baseline RT60 measurement, prioritises ceiling absorption first, and layers wall panels and sound masking to meet the 0.4–0.6 second RT60 and 40–48 dB LAeq targets that define a functional open-plan office.
| Point | Details |
|---|---|
| Ceiling absorption comes first | Baffles and clouds on the ceiling deliver the largest RT60 reduction per dollar in open-plan offices. |
| Measure before you spend | An on-site RT60 baseline prevents misdiagnosis and wasted product spend; verify again after installation. |
| Match the solution to the problem | Acoustic panels reduce reverberation; soundproofing (STC) blocks transmission; masking protects speech privacy. These are not interchangeable. |
| Pilot one zone before the full floor | A well-treated 400 sq. ft. focus zone proves the approach and builds the business case for a larger investment. |
| JupiterAV for Calgary offices | JupiterAV measures, specifies, and installs integrated acoustic and AV systems for commercial offices in Calgary. |
Table of Contents
- What does office acoustic treatment actually do?
- Common materials and product types for office sound absorption
- Where should you place acoustic panels in your office?
- DIY acoustic panels or a professional install: how do you decide?
- What does office acoustic treatment cost in Canada?
- Where to buy acoustic panels and materials in Canada
- What a professional acoustic project looks like from start to finish
- What JupiterAV has learned about office acoustics
- JupiterAV acoustic and AV solutions for Canadian offices
- Sources
What does office acoustic treatment actually do?
People use "acoustic treatment" and "soundproofing" interchangeably, but they solve different problems. Acoustic treatment reduces reverberation inside a room by absorbing sound energy. Soundproofing blocks sound from passing through walls, floors, or ceilings between rooms. A fabric-wrapped panel on your wall is treatment. A double-stud wall with resilient channel is soundproofing. You almost always need both, but in different proportions depending on what is going wrong.
The practical framework for any office acoustic project has three pillars:
- Absorption reduces RT60 by converting sound energy to heat inside porous materials. Mineral wool, fibreglass, and PET felt panels are the workhorses here.
- Blocking limits sound transmission between zones using mass, decoupling, and air-sealing. Measured in STC (Sound Transmission Class).
- Masking raises the ambient noise floor with a calibrated broadband signal, typically tuned to roughly 45–48 dBA using the ASTM E1130 reference spectrum, so nearby speech becomes unintelligible without feeling louder.
The broadly accepted targets for standard open-plan offices are RT60 between 0.4 and 0.6 seconds and background noise around 40–48 dB LAeq. Speech Transmission Index (STI) targets vary by zone but generally aim to restrict intelligible speech to the immediate vicinity of the speaker. ISO 22955:2021 formalises this further by recommending acoustic design by activity type rather than a single blanket dB target.
Pro Tip: In a large open-plan floor, prioritise ceiling absorption before touching the walls. The ceiling is the largest unbroken reflective surface, and treating it first gives you the biggest RT60 drop for the least disruption.
Common materials and product types for office sound absorption
Every acoustic product you will encounter is built around one of four core materials, and each makes different trade-offs.
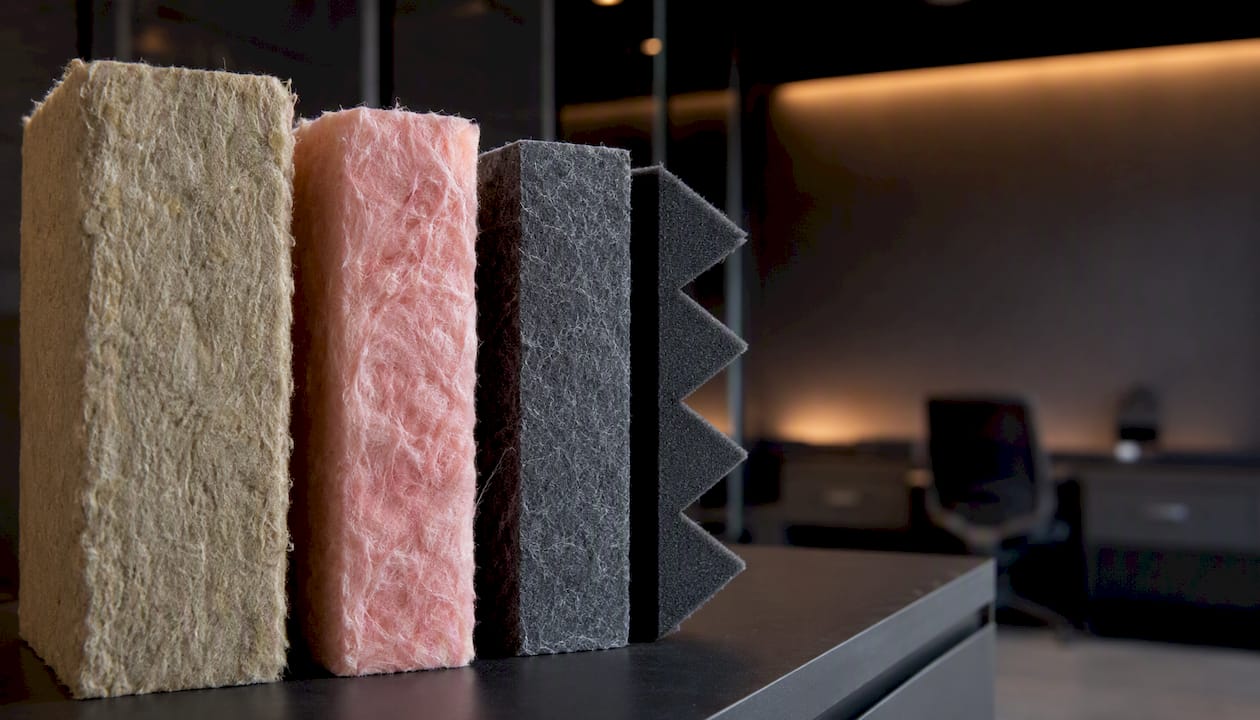
Mineral wool (rockwool/stone wool) is the commercial standard. NRC ratings of 0.90–1.05 are typical for 50 mm boards. It is non-combustible, which matters for Canadian building code compliance, and it carries low-VOC credentials. The trade-off is weight and the need for a proper frame or suspension system.
Fibreglass performs similarly to mineral wool and is common in North American commercial panels. It is slightly lighter, but requires careful handling during installation and the same fire-rated facing fabrics for exposed applications.
PET felt (recycled polyester) has become popular in open offices because it is lightweight, available in a wide range of colours, and genuinely low-VOC. NRC performance is typically 0.65–0.85 for standard thicknesses, which is lower than mineral wool at equivalent thickness. It is a good fit for wall panels and desk screens where aesthetics matter.
Acoustic foam (open-cell polyurethane) is the cheapest option and the most commonly oversold. It works well at mid and high frequencies but does almost nothing below 500 Hz, which is where most office reverberation problems live. Foam is rarely the right choice for a commercial office.
Pro Tip: Always ask for the fire rating and low-VOC certification before ordering panels for a Canadian commercial space. Most jurisdictions require Class A or Class 1 flame spread ratings for exposed materials in occupied offices. A supplier who cannot produce a test report is a red flag.
Where should you place acoustic panels in your office?
Placement matters as much as quantity. Scattering panels randomly across a room rarely hits the RT60 target; placing them at the right surfaces does.
For open-plan floors, the priority order is:
- Ceiling first. Ceiling baffles and clouds are typically the most cost-effective first step because the ceiling is the largest continuous reflective surface and is usually unoccupied by furniture or equipment.
- First-reflection wall points. Identify where sound from a typical workstation bounces off the nearest wall before reaching a neighbouring desk. Panels at those points reduce the perceived echo without covering every square metre of wall.
- Parallel walls. Hard parallel surfaces create flutter echo, that rapid, metallic slap you hear when you clap in an empty room. Treating at least one of each parallel pair breaks the bounce.
- Front and back walls in meeting rooms. Treating parallel front-and-back walls first is the standard starting point for meeting rooms; add ceiling treatment only if RT60 targets are still not met after the walls are done.
A rough coverage calculation: for a 200 sq. ft. meeting room with hard surfaces, you typically need acoustic absorption equivalent to about 25–35% of the total surface area to reach an RT60 near 0.5 seconds. For an open-plan floor, ceiling coverage of 30–50% with baffles or clouds combined with perimeter wall panels usually produces a meaningful reduction. A professional acoustic survey will give you exact numbers based on your room's geometry and existing finishes.
Maintenance note: Fabric-wrapped panels can be vacuumed gently with a brush attachment. PET felt panels wipe clean with a damp cloth. Acoustic foam is harder to clean and degrades over time; budget for replacement every five to seven years in a busy office. Avoid steam cleaning any panel with a mineral wool core.
DIY acoustic panels or a professional install: how do you decide?
The honest answer is that most offices need both. A few well-placed DIY fixes can make a noticeable difference in a small space, but a floor with privacy requirements, complex geometry, or HVAC noise needs professional measurement to get right.
Work through this checklist:
- Project scale. Under 500 sq. ft. with simple geometry? DIY is viable. Larger floors, multiple zones, or a whole building? Hire a pro.
- Confidential conversations. Legal, HR, medical, or financial discussions happening in open or semi-open areas? You need a professional speech privacy assessment, not just panels.
- Ceiling height and finishes. Exposed concrete ceilings above 3.5 m require suspension hardware and structural checks. Not a DIY job.
- HVAC background noise. If your HVAC is already loud, masking may be counterproductive and the mechanical system needs attention first. A pro can measure this.
- Budget. DIY panels from a retail supplier cost roughly $30–$80 per panel. A professional survey and specification adds cost upfront but prevents expensive mistakes.
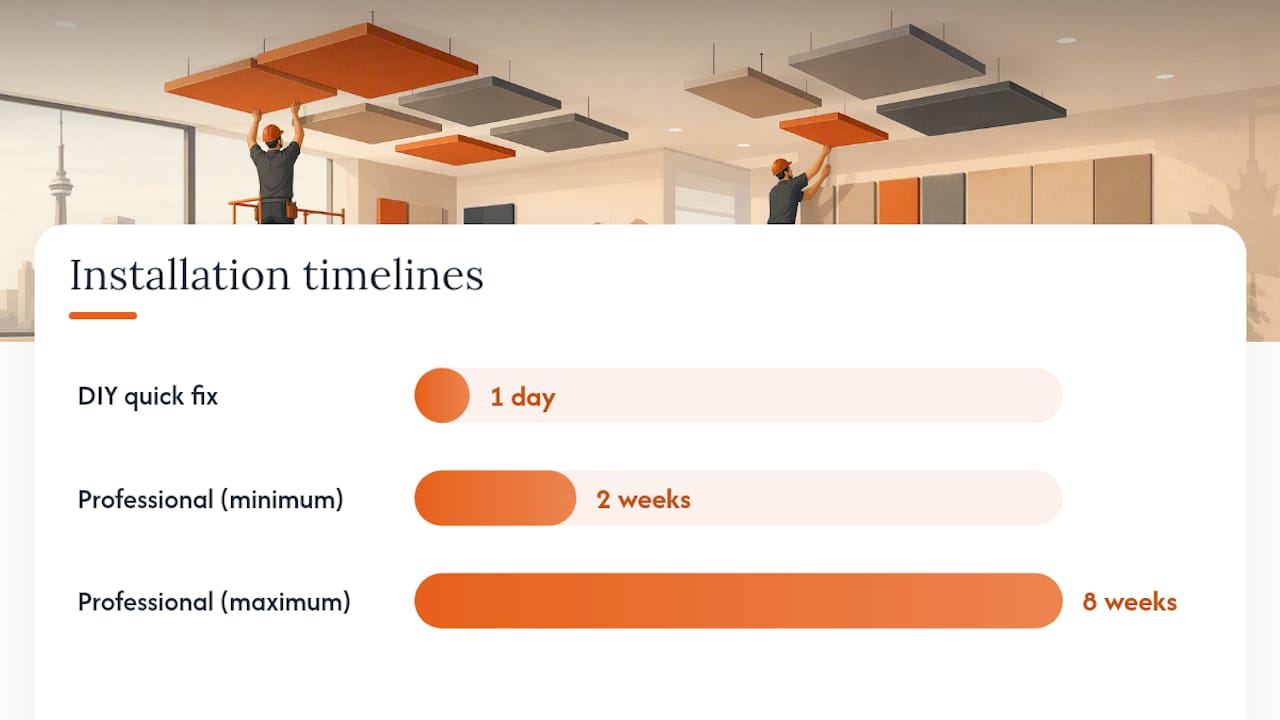
- Timeline. A quick DIY fix can go up in a day. A professionally designed and installed scheme takes two to eight weeks from survey to completion.
Questions to ask a professional installer:
- Can you provide on-site RT60 measurements before and after installation?
- Do your products carry fire ratings and low-VOC certifications for Canadian commercial use?
- What is your warranty on materials and workmanship?
- Can you provide references from comparable office projects?
- Do you carry liability insurance and WSIB coverage?
Red flags: A contractor who quotes without visiting the site, cannot produce fire rating documentation, or promises a specific dB improvement without taking baseline measurements is not worth hiring.
Simple DIY fixes that help immediately: A large area rug on a hard floor, soft seating in a breakout zone, bookshelves filled with books along a hard wall, and a few PET felt panels on the noisiest wall can each reduce perceived echo noticeably. These are not substitutes for a proper treatment scheme, but they are a reasonable starting point while you plan the larger project.
What does office acoustic treatment cost in Canada?
Cost ranges vary widely depending on scope, finishes, and whether the project includes masking or STC upgrades.
Quick fixes and small-zone interventions (a single meeting room or a focus zone of 200–400 sq. ft.) typically run in the low five figures, including materials and installation. A DIY approach using retail panels from a supplier like Home Depot Canada can bring that down significantly, though commercial-grade performance is harder to guarantee.
Whole-floor schemes (1,000–5,000 sq. ft. open plan with ceiling baffles, wall panels, and a masking system) typically land in the mid five to low six figures, depending on ceiling complexity, custom finishes, and whether structural work is needed for suspension points.
Factors that push costs up:
- STC upgrades to existing partitions (demountable systems, glazed walls)
- Custom-fabricated clouds or rafts with integrated lighting
- Sound masking system design, installation, and calibration
- Supply lead times for commercial-grade panels (four to eight weeks is common in Canada)
- After-hours installation to avoid disrupting staff
Timeline expectations: A professional site survey and acoustic design typically takes one to two weeks. Procurement adds two to six weeks for commercial products. Installation of a small zone takes one to five days; a full floor is usually phased over two to four weeks to keep the office operational.
The ROI case for acoustic treatment is easier to make than most managers expect. Reduced noise complaints, fewer sick days tied to stress, and measurable improvements in concentration time all translate to recovered productivity. Framing the investment against those outcomes, rather than just the headline installation cost, tends to move budget approvals faster.
Where to buy acoustic panels and materials in Canada
Canadian offices have three realistic sourcing channels, and the right one depends on project scale and performance requirements.
- Big-box retail (Home Depot Canada): Good for pilot projects, quick fixes, and small meeting rooms. Home Depot Canada lists consumer and trade acoustic panels and ceiling products suitable for small-scale work, but listings often omit the NRC ratings, fire certifications, and dimensional tolerances that commercial projects require. Use retail for speed and accessibility, not for specifying a whole floor.
- Specialty acoustic fabricators: Companies that manufacture fabric-wrapped panels, baffles, and clouds to commercial specifications. They can provide full technical data sheets, custom sizes, and fabric options. Lead times are longer but performance is verifiable.
- National building materials suppliers: Distributors carrying mineral wool board, fibreglass insulation, and suspension hardware for contractors. Useful when a local installer is fabricating panels on-site.
- Local AV and acoustic installers: For turnkey projects that combine acoustic treatment with AV integration (ceiling speakers, sound masking, video conferencing), a local installer who handles both is often the most efficient path. They source commercial-grade products through trade channels and manage the full project.
When evaluating any online product listing, require four things before ordering: NRC rating with test standard, fire rating (Class A or equivalent), panel dimensions and thickness, and mounting or suspension details. If a listing does not include all four, contact the supplier directly before purchasing. Shipping lead times for large panel orders to Canadian addresses can add two to four weeks; factor that into your project schedule.
Pro Tip: For a built-in desk or workstation layout that already incorporates soft surfaces and storage, the acoustic benefit of desk-level screening is often already partially addressed. Check what your existing fit-out contributes before specifying additional desk dividers.
What a professional acoustic project looks like from start to finish
A well-run office acoustic project follows a clear sequence, and knowing what to expect makes it easier to evaluate proposals and hold contractors accountable.
Step 1: Site survey and baseline measurements. A qualified installer visits the space and takes RT60 readings in multiple locations, measures background noise levels (LAeq), and documents ceiling height, surface materials, HVAC noise, and partition types. This baseline is the reference point for everything that follows.
Step 2: Schematic design and coverage calculation. Using the baseline data, the designer calculates how much absorption is needed to reach the target RT60, identifies placement zones, and selects product types. Acoustic zoning, designing different targets by activity type, combined with a mix of ceiling baffles, wall panels, and screens, typically produces the best real-world outcomes for open-plan offices.
Step 3: Product selection and sampling. The installer specifies products with full technical data (NRC, fire rating, VOC, dimensions) and, for larger projects, provides physical samples for client approval before ordering.
Step 4: Installation. Panels are installed per the design drawing. Ceiling baffles and clouds require suspension hardware and, in some cases, structural engineer sign-off. Wall panels are typically mounted on a French cleat or direct-fix system.
Step 5: Verification testing and post-install tuning. After installation, RT60 is measured again at the same locations as the baseline. A professional report documents the before/after comparison. If a masking system is included, it is calibrated to the target level (typically 45–48 dBA) and fine-tuned by zone.
What to request from your installer:
- Written baseline and post-install RT60 reports
- Fire rating and health/safety data sheets for all installed products
- Workmanship warranty (minimum one year; two is better)
- References from comparable commercial projects in Canada
- Project photography and, where possible, audio recordings for before/after comparison
A placeholder for a local case study belongs here: once JupiterAV completes a Calgary office project with documented RT60 measurements, that before/after data and project photography can be inserted to demonstrate the process in a real local context.
What JupiterAV has learned about office acoustics
The most common mistake offices make is treating acoustic treatment as a one-time purchase rather than a designed system. A manager orders a dozen foam tiles from a retail site, sticks them on one wall, and wonders why the room still sounds terrible. The tiles addressed maybe 15% of the reflective surface area, at the wrong frequencies, in the wrong locations. The reverberation problem is essentially unchanged.
The second mistake is conflating treatment with soundproofing. Panels on the walls will not stop your finance team from hearing the sales floor. That requires mass, decoupling, and air-sealing, a fundamentally different intervention. Mixing up the two leads to projects that spend real money and solve the wrong problem.
What actually works is a measured, layered approach: baseline RT60 first, then ceiling absorption, then targeted wall treatment, then masking if privacy is the goal. That sequence is not complicated, but it requires honest measurement at the start and verification at the end. Any contractor who skips the baseline measurement is guessing, and in a commercial space, guessing is expensive.
The offices that get this right tend to share one habit: they treat a single zone well before committing to the whole floor. A well-specified focus zone of 400 sq. ft. tells you more about what works in your specific building than any amount of planning.
JupiterAV acoustic and AV solutions for Canadian offices
Calgary offices dealing with echo, poor speech clarity, or open-plan noise have a direct path to a solution through JupiterAV. The team handles the full scope: on-site RT60 measurement, acoustic design, commercial panel supply, installation, and post-install verification, alongside integrated AV systems including ceiling speakers, sound masking, and video conferencing infrastructure.

That combination matters because acoustic treatment and AV rarely work in isolation. A sound masking system calibrated correctly to 45–48 dBA needs ceiling speakers placed to match the acoustic zones, not just the lighting grid. A boardroom with a new video conferencing setup needs the RT60 brought down first, or the microphones will pick up every reflection in the room. JupiterAV designs both sides of that equation together.
If you are ready to move from guessing to measuring, book an on-site assessment with JupiterAV and get a baseline RT60 report for your space before committing to any product spend.
Sources
- Open Plan Office Acoustics: A Design and Compliance Guide | NOVA Acoustics
- Open Plan Office Acoustics: A Practical Guide | Sound Zero
- Office Acoustics: How to Reduce Echo and Improve Speech Privacy in Open-Plan Spaces - Unidus Acoustics
- Homedepot
- Office acoustics solutions for UK workplaces | Sound Zero